-
Downloading
VZfit apps are not searchable on the Oculus Store, but they are delivered and updated by Oculus to your headset. To get them, make a free VZfit account and follow the instructions in App Downloads at virzoom.com/account.
Note that Explorer requires an average 5 Mbps Internet connection to download 360 degree panoramic images smoothly. You can check your headset’s internet connection by going to fast.com.
-
Connecting Bike
When you start the game, it will ask you to press A to wakeup and connect your thumb controller. You must have previously paired your thumb controller to your Oculus headset following the setup guide. If it doesn’t connect try repairing. You can tell if the thumb controller is paired even outside of VZfit by pressing its +/- buttons to change headset volume.
After that, it will ask you to pedal forward to connect your bike, on which you should have attached the crank sensor. It’s important that you pedal forward, it’s how the game knows which sensor direction is forward, since it can be mounted on either side. If it doesn’t connect, try manually turning the sensor in your hand to see the green connection led flash. If it doesn’t flash try reinserting the battery to reboot the sensor.
The first time you connect you’ll be asked to register your bike with your VZfit account, using a registration code.
-
Demo Using Your Body
You can now try VZfit before you have a bike, just by using your body. We call this standup mode, and it will become the new default way to play VZfit after it has all the features of our bike mode.
You can choose standup mode on the game startup screen by hitting the Y/B button on your Oculus hand controller. If you are already signed into Explorer with your bike, you will need to press Y/B twice, once to “connect new device” and then again to enter standup mode.
You will play standup mode with the premium or freemium membership associated with your bike. New users won’t be able to signup or try premium until they get a bike, for now.
The first thing you’ll notice when selecting standup mode is it asks you to stand in a clear area before recentering to start the game. Make sure you have at least one meter space around you, and are holding both oculus hand controllers. We’ll be using the oculus hand controllers more for menus and recentering, but for now (and ever with bikes) we still have gaze-buttons.
When you start the game you’ll be standing on your new vehicle, called an “Exerboard”. It’s a futuristic cross between a Can-Am and Segway, that reacts to your head and hands motion to drive. It works with customizations, snapshots, multiplayer, and every other mode we have. In 3rd person you’ll even see yourself standing on it, animated by your head and hands.
Any kind of head and hands motion will start it moving. You can sway your arms like walking, or do squats and lunges, or mimic cross country skiing. We tuned it to similar amount of energy you out into biking for a workout. You head generates more speed than your hands because it takes more energy to move. And it matter how much your hands move relative to your head. Use both hands to get the most speed from them.
By default you play standup mode with autosteering. But you can still switch to Tilt steering to control yourself, which can feel more like a real walk, and which you’ll need to take your own turns in open rides. When you go back to bike mode you can also switch back to Lean steering if you prefer.
-
Introduction
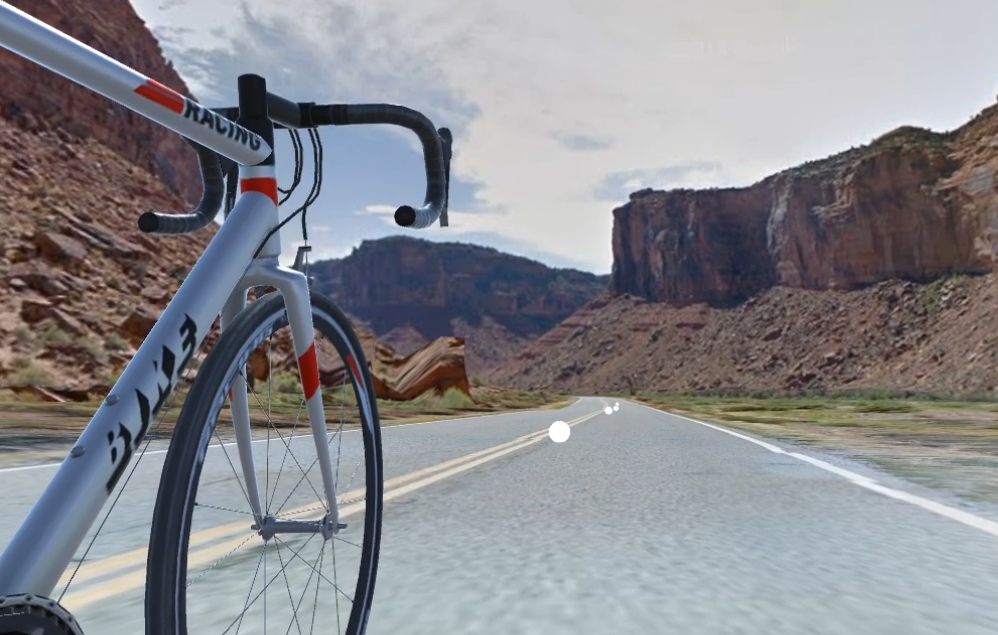
In Explorer, you move through the world based on your own exercise movement.
Your first time through you’ll be directed to press the menu button and given instructions to pedal forward, lean to steer, and aim for the white dots. The white dots are where 360 degree pictures were taken that you can see in the world. You have complete control over your bike’s movement as in Play, but you need to keep on the path between the dots for the illusion of traveling between them to work.
While you can steer freely in Explorer, you are only allowed up to 12 feet away from the path connecting the white dots, because it’s not a complete model of the world.
If you look closely you can see that we also try to match up your shadow and light color on your avatar to the sky color along a ride.
When you stop moving, Explorer will automatically start loading a high-res view of the scene, which you can see after it loads by holding the Y/B button.
-
Heads Up Display (HUD)
The HUD shows your session time, session spins, and current rpm. Above it you can change difficulty which adjusts your virtual speed, lower numbers make you go faster for the same pedaling speed. Below it you can see the % completed and distance left in the current ride. When you’re creating a ride with unspecified ending, the distance shown is the amount you’ve traveled.
In the center below the HUD is a compass which also acts as the MENU button. Look up and press A on it to get back to the main menu.
-
Main Menu
The main menu states the ride you are currently on, and alternately shows the nearest street address and lat/lon coordinates every 5 seconds. It has four buttons which take you to
EXPLORE RIDES: Select a category and a ride from here, and manage your rides.
CREATE RIDE: You can pick any start location, followed by end location, to ride by keyboard or voice entry.
CUSTOMIZE: Spend coins you’ve earned to customize your avatar.
OPTIONS: Enable options for your ride, including AI trainer workouts.
MORE: Choose behaviors like multiplayer, game tips, and other actions.
When you are creating an open-ended ride, the menu will look a bit different. It won’t have the Explore or Create Ride buttons, but will have
END RIDE: End and save your ride.
BACKUP: Go back 50 yards in case of wrong turn.
You can back out of any submenu with the “<” button. When you’re in a ride get back to the main menu by hitting the compass button in the HUD.
-
Explore Rides
On the Explore Rides menu you will see tabs of rides. The distance of each ride and your current percent complete is overlaid on each ride.
Suggested: These are rides VirZOOM has curated, in order from earliest to latest. Each suggested ride has a leaderboard on vzfit.com/stats that shows the percentage done and earliest completers of its riders. A “new” icon will appear on the main menu when there are new suggested rides.
New: These rides are sorted by their creation date, newest to oldest. They include all suggested rides as well as user-created and shared rides.
Popular: These rides are sorted by total number of spins on them by riders, whether or not they were completed. This may not be the best algorithm as it weights older rides, so we’re looking into something better, like user ratings.
Favorite: These are rides you have marked as your favorites from each ride’s option menu. You can also unfavorite a ride from there.
Recent: These are rides you have most recently chosen. You can forget recent rides from these rides option menu.
Created: These are all the rides you have created yourself. On the options menu of these rides you can share (or unshare) them with other riders. You can also delete unshared rides.
When you select any ride you’ll see the following details and actions:
Thumbnail: Shows you the beginning of each ride
Location: Its beginning region and country, and date it was created. If you start a ride and go to the main menu, you will see your current location, and if you wait 5 seconds you will also see its latitude and longitude.
Rides: How many times you have completed this ride. In the future we’ll add a best time so you can race yourself!
Options: Share, favorite, forget or delete rides. Note this menu is sensitive to the ride tab you are on.
At the bottom of each ride are buttons to start it.
Resume Ride %: If you have previously started a ride, you can resume it from your last percent complete with this button
Ride from Start: Start (or restart) a ride from the beginning of its path, with directions to its end point.
Ride from End: Start (or restart) a ride from the end of its path, with directions to its beginning point. This can double the view and enjoyment you get from any ride.
-
Create Ride
In Explorer you can travel anywhere in the world, so of course you can create your own rides, and share your best rides for other players to enjoy!
Using the Create Rides screen, you can enter the start location and the end location and go! For each location you can use the virtual keyboard to enter any address or latitude, longitude. You can also use voice recognition by pressing the microphone button to record, saying the location, then pressing the microphone again to stop recording.
After you’ve entered the start location, the game will tell you if that location has Streetview image data. If not please try a more specific address, or find a closeby location at maps.google.com that has Streetview information.
When you have an acceptable start location hit the NEXT button to enter the end address. Pro Tip: if you hit the NEXT button without entering a start location, the game will use your current location.
Enter your end location the same way, and then hit the GO button to start your ride. The dots will show you the shortest path from Google directions.
Pro Tip: if you hit the GO button without entering an end location, the game will put you into “free ride” mode where you will be able to ride anywhere that Streetview goes from your start location. When you are done free riding, hit the Compass button and select End Ride from the menu to complete it.
Note you can only share rides that you have completed yourself. Because image quality can vary along a ride, this makes sure you are only sharing rides that have a good level of quality from start to end.
Created rides are automatically named “Player’s Location Ride”, where Player is your account name, and Location comes from the start point.
Using Google MyMaps
You can also now create rides outside of the game using Google My Maps on your PC or phone. This gives you far more control over the ride directions, and you can also choose the Location in your ride’s name.
-
Customize
You’ll pickup coins every kilometer you ride, and as an end-of-ride bonus on new rides, that you can spend decking out your avatar on the Customize menu. You can currently customize your jersey, shorts, socks, shoes, and helmet. See how things look on you before you spend the dough! It’s a great way to “wear” your progress especially for snapshots. We’ll be adding more categories like bike design and snapshot poses.
-
AI Trainer
On the Options menu you can enable the AI trainer. You can switch from None, Female, or Male trainers. When you have selected a trainer, they will appear and ride ahead to your left and pace you along the Workout you can then select, and offer encouragement and congratulations along the way!
Each workout has easy, medium, and hard sections where you will need to pedal faster or slower to keep up with the trainer. The section type and seconds left in it will appear over the trainer’s head. The HIIT workout also has all-out sections which are mercifully short.
If you have trouble keeping up in any workout, you can adjust your difficulty setting above the HUD. Lower difficulty makes you go faster with less pedaling.
The default workout mode is Interval, which is a 20 minute total loop with smaller loops between easy to hard sections. The Heart workout alternates between medium and hard sections to get your heart pumping faster. The Tabata workout goes more between hard and light extremes. The HIIT workout has short all-out intensity sections to really burn calories.
The trainer isn’t current available in Comfort Mode because their relative motion wouldn’t look correct against slideshow scenes.
-
Rendering Mode
Another important setting on the Options menu is the rendering mode. This affects how the Streetview images are displayed for you to ride through.
Country mode is the default, which uses depth information to morph Streetview images to ride over. It works better with country rides which have less conflicting depth data than cities. This is the best option for VR immersiveness when the data is good.
Comfort mode does not perform any morphing, so you’ll see absolutely no distortion, but you also won’t see that you are moving over the road because that requires morphing distortion. So it feels like a 360 slideshow you are controlling with your pedaling and steering. This is the best option for players that feel simulation sickness.
City mode projects 360 images onto 3D building outlines determined from online map data. This can work better than depth data in cities. It also shows virtual roads over the 360 images, which can cover up traffic which is more frequent in city rides. This mode can alleviate simulation sickness because it doesn’t offer as much distortion as country mode, and it also forces rides to be flat so you won’t feel any hilliness.
-
Other Ride Options
Besides the trainer and mode, you can enable other options that affect your control or rendering of the ride.
View: cycles between a first person or male and female 3rd person views. Choose the one you are most comfortable with. The 3rd person views are higher up and can make you feel like you are going less fast.
HUD: lets you choose between low and standard locations. A low HUD is easier to see for people riding forward like on spin bikes, but can takes up more of your view.
Distance: shows either kilometers or miles in the HUD and Ride details.
Monoscopic: determines whether your left and right eyes are shown a different perspective (stereoscopic) or are not (monoscopic). Monoscopic reduces your perception of depth distortions and can make a ride feel more like a movie. Note it is forced on in Comfort mode, and is also on by default for the Oculus Go as an optimization.
Steering: chooses between automatically steering down the path, or steering from tilting your head clockwise or counterclockwise. The Quest only also supports steering from moving your body side-to-side. Lean-steering gives your head more freedom to look around, but tilt-steering can feel more comfortable because it doesn’t require any leaning. When tilt-steering just make sure to keep your head up when looking around to avoid accidental steering. When auto-steering try to look ahead of turns to reduce motion sickness.
-
Online Matchups
Explorer supports riding with other online players to chat, race, and choose rides together.
From the More menu you must first Enable Matchups. This allows you to find other online rides, and for other online riders to find you. If you are in an online ride with someone else and want to quit, disable matchups with the same button.
When matchups are enabled you can Find Matchups. This button will show you other online riders, which you can select to join their ride in progress. Note by going to the Find Matchups screen you yourself cannot be found, so if you are trying to find a friend make sure only one of you is looking.
The rider being joined is the “leader” and the rider who joined is the “follower”. The follower is teleported to the leader’s ride just behind them, and the leader is notified of the matchup. The follower will use the same rendering mode as the leader during the matchup. Note the follower can’t get completion or leaderboard credit for matchup rides because they could start anywhere.
During a matchup you will hear and be able to talk to the other player. You will also see their bike and even see where they are looking.
There is currently no Mute option but we’ll be adding one soon. Until then that is why Matchups are disabled by default.
-
More Menu
From the More menu you can also
Logout of Explorer (to then login as another user)
Quit Explorer
Launch VZfit Play
Take a Snapshot with your favorite pose and upload to the web for others to see